Why I Always Follow [my students] Back

ios_homescreen_iconThe first time it happened it was kind of alarming. I had been using my Twitter account to share ideas with other technology-minded educators when two of my former third graders (then in sixth grade) started following me. At first I wasn’t sure how I felt about it. Granted I am the kind of educator who shares the appropriate parts of my personal life with my students, but being followed by former students now in another school seemed different.

About the same time, I heard Greg Kulowic of EdTechTeacher talk about his similar experiences with his high school students. I came away in agreement that the things I post on my Twitter account (which is public) are not scandalous and are the kinds of things I’d share with my students anyway, so there’s no harm in them reading my tweets. I don’t tweet things I wouldn’t want my grandparents or boss or students to read.

But to follow back?

After some back and forth, I decided to follow my students back. In the end I saw it as them experimenting with a new technology, and having a trusted educator keeping an eye out for them isn’t a bad thing. These days, our students are using a lot of technologies their parents may not understand so if we can have other caring adults help them navigate these technologies, that’s a good thing. And it soon paid off for one of them. origin_8484119632

A few months later one of my former students’ Twitter accounts was hacked and started sending out spammy direct messages. I tweeted her to let her know she needed to change her password. She responded that she had, but that the messages kept sending and that she didn’t know what to do; she needed help – at 7pm on a Tuesday evening. So me in my kitchen and my former student (not sure where) worked together on how disable all the apps that she’d given access to her Twitter account and then add back only the trusted ones. Ten minutes Later: crisis averted.

Kevin Honeycutt talks about our students being on a digital playground where there is no one on recess duty. He’s absolutely right; our students need us to be a part of their online lives.

We need to be at recess with our students, showing them how to play safely and helping them if they get into trouble.

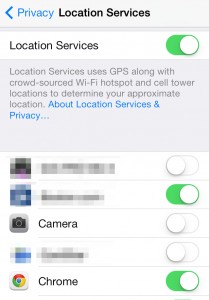
Note: Instagram is a a bit of a sticky wicket for me since most of my students (current and former) are under the age of 13, the age Instagram requires for an account. But at the end of the day, Instagram still part of that digital playground.

photo credit: kjetikor via photopin cc

Embedding a Video in Blogger (without YouTube)

UPDATE: Currently (10/31/2014) this does not work in the new Google Drive. The new Drive won’t allow you to open a video in the Google Drive viewer. You’ll need to revert back to the old Google Drive to get the embed code (Step 2 below). To get back the old Drive, click on the gear icon in the upper right corner of the Drive screen and select “Leave the new Drive.”

More and more teachers these days are blogging as a way to communicate with parents and the community about what they are up to. And more and more teachers are using handheld devices (smartphones and tablets) to record what happens in their classroom. Embedding from YouTube is a great way to share videos, but what if you don’t want to (or can’t) use YouTube? There’s another way:

You’ll need to:

  1. Store the video in Google Drive
  2. Get the embed code
  3. Embed the video in Blogger

Step 1: Storing a Video in Google Drive

Storing videos to share in your Google Drive is all well and good, but you have to make sure you don’t (ever, ever) delete them or they’ll disappear from your blog. Because of this, I suggest creating a folder for blog files. Be sure to set the Sharing settings so others can see the contents of that folder.

How? Once you’ve created your blog folder, select it and click the sharing button.

Select your blog folder, and change the sharing settings.

Change the privacy settings for the folder.

Change the privacy settings for the folder.

Select “Anyone with the link” and save.

Screen_Shot_2014-01-30_at_1_58_42_PM-2

Now anythings that goes in this folder will be available for anyone on the web to see (if they have a direct link; they won’t be able to search for it). And since everything for you blog is going to be stored in a folder together you don’t have to worry about accidentally deleting something.

Step 2: Getting the Embed Code

Once your video is in Drive, open it up. It will default to a preview window. Click the Open button at the bottom. Screen_Shot_2014-01-30_at_2_14_21_PM-3

When the video truly opens, open the File menu and select “Embed this video..”

Screen_Shot_2014-01-30_at_2_15_02_PM-2

Then copy the code it displays to the clipboard.

Screen_Shot_2014-01-30_at_2_15_21_PM-5

Step 3: Embedding Your Video in Blogger

Now, over to blogger.

When you are creating/editing a post you have the option of the Compose view and the HTML view. You’re probably used to the Compose view.

Switch over to the HTML view.

Screen_Shot_2014-01-30_at_2_29_29_PM-2

Paste the Embed Code. You can ignore the rest of the code; we’re just here to drop off the embed code.

Screen_Shot_2014-01-30_at_2_30_42_PM-5

And switch back to the Compose view. A video window will appear in your post.

Screen Shot 2014-01-30 at 2.31.12 PM

Your blog post has a video and you’re ready to publish!


Note 1: Yes, Blogger does have an option to upload a video directly to them, but I have yet to have consistent luck with that. It either doesn’t work, or the processing takes a prohibitive amount of time.

Note 2: This same embedding process also allows you to embed Google Drive documents, spreadsheets, PDFs etc in Blogger. However, instead of File -> Embed this video, you’re looking for File -> Publish to the web. From there you can grab the Embed Code.

Smartphones, Photos, and Metadata

We all know some vague, detail-less version of this story:

amber alert logoSomewhere, a loving parent takes a picture of their child with a smartphone and posts the picture online. Some nefarious individual gets a hold of the picture and hacks into it to figure out exactly where the picture was taken. The region finds itself in the grips of an Amber Alert.

Technology is supposed to help us? Can this really happen? And how can I share photos of my kids (they’re so cute after all) and fell safe doing it?

Understanding Digital Photos

If you’re old enough to remember film, you know that a film picture doesn’t carry a whole lot of data with it. It’s basically just a picture. On the back (depending on where you got it developed) may be a printed date, but that was the developing date not the date the photo was taken. The obsessive-compulsive among us found ways to keep track of dates and locations, but that information was not inherently a part of the picture.

xsi_1_l

Enter digital photographs. A digital photo file is much more than a physical photograph, so much more. Each file contains a picture, but it also contains something called “metadata,” or data about data. If I dust of my old digital Canon Rebel XSi and take a picture, this is the metadata it records (in addition to the picture itself):

  • Date/time the photo was taken
  • Photo dimensions
  • Color mode
  • Focal length
  • Which lens was on the camera
  • Whether the flash fired
  • Metering mode
  • White balance
  • Aperture and shutter speed
  • Film speed (ISO)
  • My camera’s serial number

And you thought it was just a mere picture. Also, there’s space in the metadata for me to add things like:

  • My name/address/website
  • Copyright information
  • Description
  • Keywords for searching
  • and lots more…

Now there are lots of reasons why this is great data to have access to. As the owner of the photo I have lots of very useful information about each photo (such as all the camera settings). As an end user I can easily find the owner and copyright information of each digital photograph (if that information is filled in). Having all this information on a film-based picture would be highly impracticable, if not impossible.

What About Smartphones

iphone5sSmartphones have one key feature that my Canon digital camera doesn’t have: access to GPS. There’s a space in the metadata for that information too (even the direction you’re facing too). And your GPS is pretty reliable – it can probably tell you what room of your house you are in. Try it now: open the maps app on your phone, switch to satellite view, and zoom in as far as you can. Your phone has a pretty good sense of where on the planet it is (which is pretty amazing if you think about it).

Also, wireless routers know where they are too. So if you connect a non-GPS tablet to the internet via a wireless network (which we all do all the time) you can get some pretty good location data. So just because you don’t have GPS on your device, the capability to get location data is still there.

Now this location data is not inherently bad. As a photographer, being able to tag the location of where I took a photograph is great. How many times have you asked yourself, “Where did I take this picture?” Of course if you’re making the photo public you might not want that information attached to the photo.

The good thing is that as a user, you have the ability to decide which apps have access to your GPS/location data. For things like weather and maps, having those apps know my exact location is a good thing; I want them to know where I am. But maybe not for photos.

Smartphone Settings

photo

For iOS users (iPhones, iPod Touches, iPads), go into your Settings App. Select the Privacy section and then select Location Services. Here, you can select which apps you want to have access to your location, or you can turn all location data off.

For Android users, go to Settings and select the Location option. Here you’ll be able to manage your Location Services.

How Do I Know What Data is There?

Photo metadata is often referred to as “exif data.” For iOS users, there’s a simple free app called ExifWizard that allows you to view all the metadata for the photos on your camera roll. It also will show positions on a map if that data is provided.

What About Uploading to Social Media?

These days, for better or for worse, most social media sites strip all the metadata out of pictures you upload. Pictures going to places like Twitter, Facebook, or Flickr take all the metadata out. Google+ on the other hand, leaves it intact. WordPress blogs seem to leave the metadata intact as well. There’s a quick article about this here; information about specific social media sites it here. Be aware, these were written from a photographer’s standpoint, so the author wants his metadata kept on his photos so people knows he owns them.

It Doesn’t Have to be Scary

Smartphones are really powerful devices. They do some pretty amazing things. But if we’re going to use them responsibly and safely we need to understand what they’re capable of and how to control them.

We Are All Teachers of Technology

desksIt was about 10 years ago that I first started hearing workshop leaders pushing the idea that “we are all teachers of reading.” I was teaching kindergarten at the time, so teaching reading was already a big pat of what I was doing anyway so suggesting that we all needed to teach reading wasn’t a big deal to me. Though some of my content-specific colleagues (math, science, and social studies teachers) were less than thrilled. “We didn’t sign up to be reading teachers,” they argued. The profession pushed on, indeed the profession had changed, and (like it or not) we all became teachers of reading.

Since then, the world has continued to change. Technology now plays an increasingly large and important role in the world and the classroom (hopefully); it doesn’t matter whether it’s desktops, laptops, tablets, phones, or something in between. Because of that, we all need to be teachers of technology. I know that many of us did not sign up to be technology teachers, but we don’t have a choice; we are (in addition to all the other things we do). Of course with this it is imperative that teachers receive the support and professional development they need to become effective teachers of technology.

The world is changing.

Our roles as teachers are changing.

Today, we are all teachers of technology.

photo credit: dcJohn via photopin cc

iMovie Trailer Storyboards (UPDATED)

imovieappThe new iOS iMovie app that premiered with OS X Mavericks and the iPad Air came with a few new features including two new trailer templates. A couple of months ago I posted about using the trailers, and posted links to PDF templates.

I’ve created single-page storyboards for the new trailers, and separated the old ones into individual files. They’re PDFs, so they’re easy to use in apps like Notability if you really want to go paperless.

Some of these I created, some are from the TeachingParadox blog (which has been taken down).

Enjoy!

No, Your Classroom Blog Should Not Be Private

lockPublic or Private?

Teachers often ask me if their classroom blogs should be private of public. It’s a good question and one that always comes from a good place: if I am going to post information about my students, is it okay if its public? Absolutely (and you’re not really posting information about your students; you posting information about the learning in your class).

And I know, people are worried about posting pictures of students. That’s okay; it’s something you should be thinking about. And you definitely need to get parent permission before you do that. These days a photo permission form is usually included in the packet of forms that goes home at the beginning of school. If your school’s photo form doesn’t include something about posting pictures online, it needs to be changed.

But even if you can’t (or don’t want to) post pictures of students, you can still have a great blog. Matt Gomez, a kindergarten teacher in N. Dallas, TX recently wrote a great post about having a successful classroom blog without using students’ pictures. Even if you plan to post pictures of your students, it’s worth taking a look at his post.

Why Public?

As educators we have blogs to communicate. To communicate with parents. To communicate with the community. To communicate with other educators. To tell our story. If we make our classroom blogs private, we can’t tell our story very well. And if we’re not telling our story someone else (the media?) certainly will tell it for us. And I am sure you will do a better job telling your story than the media will.

And that story needs to be shared. A public blog can easily be shared with cousins, aunts and uncles, and grandparents.

Still a Little Uneasy About a Public Blog?

Making an unlisted blog in Blogger.

Blogger. (Settings -> Basic).

unalskdj

WordPress. (Settings -> Reading)

If a public blog still seems uncomfortable, but you understand why a private blog isn’t ideal there’s good news: there is a middle ground. Make your blog unlisted. An unlisted blog is public; anyone can view it, but only if they have the direct URL. Your blog won’t show up in search engines, but if your students want to share a post with their grandparents across the country it’s easy for them to do that. You share the blog’s URL with parents, and they can easily access and share the posts.

As educators, we need to be using blogs (and other social media) to tell our story. If we don’t tell our story, someone else will. And there’s no guarantee they’ll do a good job telling it.

photo credit: Darwin Bell via photopin cc

iPad Frozen? Try a Hard Reboot

ice cubeIt happens. iPads freeze up and become completely unresponsive. The screen doesn’t respond; the home button doesn’t work; the sleep button doesn’t work; holding down the sleep button to power down doesn’t work. Now what?

A hard reset.

To perform a hard reset hold down the Sleep and Home buttons simultaneously (like you do for a screenshot, but hold them down) for about 10 seconds. If the swipe to power down option comes up, ignore it and keep holding the two buttons down. After about 10 seconds the iPad will power down and reboot (you’ll see the Apple logo when this happens). This is the equivalent of holding down the power button on a desktop/laptop to force a power down when they freeze.

Needing to perform a hard reset on an iPad (or iPhone) should be a very rare occurrence, but it’s a good trick to know.

photo credit: djking via photopin cc

Did You Notice the New iOS 7 Timer? It’s Amazing!

There are lots of reasons why people are excited about iOS 7. But the new timer has got to be one of the best upgrades. I know what you’re thinking, “it’s just a timer.” But it’s so much better now – for three reasons.

1. It’s visual.

photo_1__2_

As teachers we use timers with our students all the time. The new iOS 7 timer not only counts down, it has a red bar that makes its way around a circle as time passes. One trip around the circle, the time is up. Halfway through your timer? Halfway around the circle. The longer the timer, the slower the movement of the red bar. It’s great for those visual students who need to see how much time they have left.

2. It’s easy to find.

photo_3__2_

It’s accessible through the control center. A quick swipe and a tap and you’re there, ready to set it. No more going back to the home screen to find the clock app. And from the Control Center, it doesn’t just bring you to the clock app; it brings you straight to the timer!

3. You can see it from the lock screen.

photo_2__2_

This is really the best. When you’re at the lock screen, your timer is right there counting down (where you want it). No longer are the days of having to unlock your iPad (or iPhone) just to check on a timer. iOS 7 has a lot of new features. Don’t overlook the new timer.

Using Blogger Labels to Communicate with Different Groups

Blogger iconThe questions usually begin like this:

  • I want a blog, but I have 6 classes (periods). Do I have to have six blogs?
  • I have a classroom blog, but I have a different group of students for reading; how do post just for my reading families?

Labels! Each blogger post comes equipped with the ability to give it one or more labels: such as “Period4” or “reading.” The options for adding labels are on the right  when you’re composing a new post (the red arrow below). When the post is published, the labels will appear at the bottom of the post. Labels are a great way to sort blog posts into categories.

Adding a label

Also notice that when you’re composing, the labels you’ve used before show up in blue and you can just click on them and they’ll be added to the post (the green arrow above).

Now posting with labels is all well and good, but what if you want a user to easily be able to find a bunch of posts with a particular label? How do those fourth period students easily access only their “Period4” posts?

Post with label

One way is to scroll through the posts looking for one that is labeled “Period4” (red arrow above). That label will be hyperlinked, and if you click on the label you’ll get a page with only posts containing that label. This will certainly work, but it means asking your users to scroll down your blog posts looking for a specific label. This could be time-consuming. Fortunately, there’s a better way.

Add gadget

From your Blogger Dashboard, navigate to the Layout screen. Along the right sidebar or the top (your choice) you can add a “gadget.” When the select gadget window pops up (pictured below), select the Labels gadget (you’ll have to scroll down to find it).

Labels gadget

Once you’ve selected the Labels gadget you’ll be given some options. Do you want to show all your labels, or just some of them? How do you want them sorted? Should they be formatted as a list or as a cloud? Should it show the number of posts per label? Once you’re set, Save it and you’re ready to go.

Labels gadget options

Now, head back to your live blog and your labels will be there for easy access. And remember, each post can have more that one label. So if you have information for more than one class, give that post multiple labels and it will show up in more than one label category.

Blog home with labels


Users can now easily click on a specific label and get access to just that content.

iPad Guided Access: Helping Students Stay on Task

It happens like this: The last few times you’ve used an app with your students they’ve all done very well… except one. You find the student makes poor decisions and finds his or her way into another app to play around. You could take the iPad away, but then the student can’t do what you need them to do. If only you could walk away and be sure they’d stay on task (or at least in the correct app). You can.

Guided Access allows you to temporarily lock the device in a specific app, and even disable part of the screen (so students can’t access a menu and navigate somewhere else).

In the Settings app, tap on General on the left, and then Accessibility near the bottom of the right-hand pane.

Accessibility

In Accessibility look for Learning: Guided Access.

Guided Access

Here, you can turn on Guided Access and set a passcode (a four-digit number).

Turn on, passcode

Now, with Guided Access on you’ll get a menu when you triple-tap the home button from within an app. This will give you options to turn off the Home button, disable the touch screen, or lock the device rotation (red arrows). You can also drag to create greyed out areas of the screen to disable specific menu items before tapping Start to activate Guided Access (yellow arrows).

Guided Access Setup

When Guided Access is activated triple-tapping the home button brings up a passcode prompt for you to disable Guided Access and return to normal functioning.

So, to help keep a student on task or confidently (and safely) share your teacher iPad with a student, consider Guided Access.

UPDATE:

You can also add a timer when you enable Guided Access.

Guided Access timer.

Guided Access timer.

When the time runs out the iPad stops working and asks for the guided access password. This could be used to say to a student, “if you work on ________ for __ minutes, you can have this incentive” or “if you can __________, then as a reward you can spend __ minutes with the __________ app.” In either case, you don’t need to be the one watching the clock – Guided Access will take care of that for you.